donderdag 7 maart 2013

Wraparound dress. Wikkeljurk


Nice cotton flowery summerdress. I can drool over them. But never going to fit girly into them.
Made a  wraparound version.
Suitable for a spastic child that sits in a custom made moulded chair.
Katoenen bloemetjes meisjesjurkjes, zo lief, maar die aantrekken bij tante Bet?
Wikkeljurkjes gemaakt.
Geschikt voor iemand die een zitorthese gebruikt.


The back panel of the skirt part is cut like the top of sitterpants. Makes it more comfortabel and sleek when sitting in the orthesis.
The denim top one was the first one I tried. I made it with snap fasteners. Second one I used a faux button closure and used tape with small nylon snap fasteners.
Het rugpand van het rokdeel is hetzelfde patroon als de achterkant van een rolstoelbroek. Zo zit het beter in de orthese zonder rimpels.
De jurk met het denim bovendeel was het eerste probeersel. Ik heb daar metalen drukknopen gebruikt voor de sluiting. Tweede versie gemaakt met tape waarop nylon drukknopen zitten en nepknoopjes sluiting.


maandag 11 februari 2013

Wheelchair harness. Fixatievest.


You do know these? Safety harness or torso vest to keep somebody in a wheelchair.in postion and safe?


I did not like them when using them for little girly. Hiding beautiful handknitted sweaters. Forever stained. Hard to clean. Often neoprene.
When girly was very young she had gray and darkblue fabric ones. I did not like them and made a home sewn safety harness vest.

Fixatievest.
Ik vond ze niet zo mooi. Grijs of donkerblauwe fixatievesten, of zwarte neopreen. Ze verstopten mooie truitjes. Vaak vies. Moeilijk schoon te houden.
After some experimenting I found that shoulder clips and a belt through the harness vest and around the back of the wheelchair  worked best. 

Ik vond het een uitdaging om te kijken of ik ze zelf kon maken. Na wat mislukte pogingen met clips zoals op de fabrieksvesten, vond ik deze het beste werken.
Schouderclips en door het vest een tunnel voor een gordel die rondom de rug van de rolstoel kan.

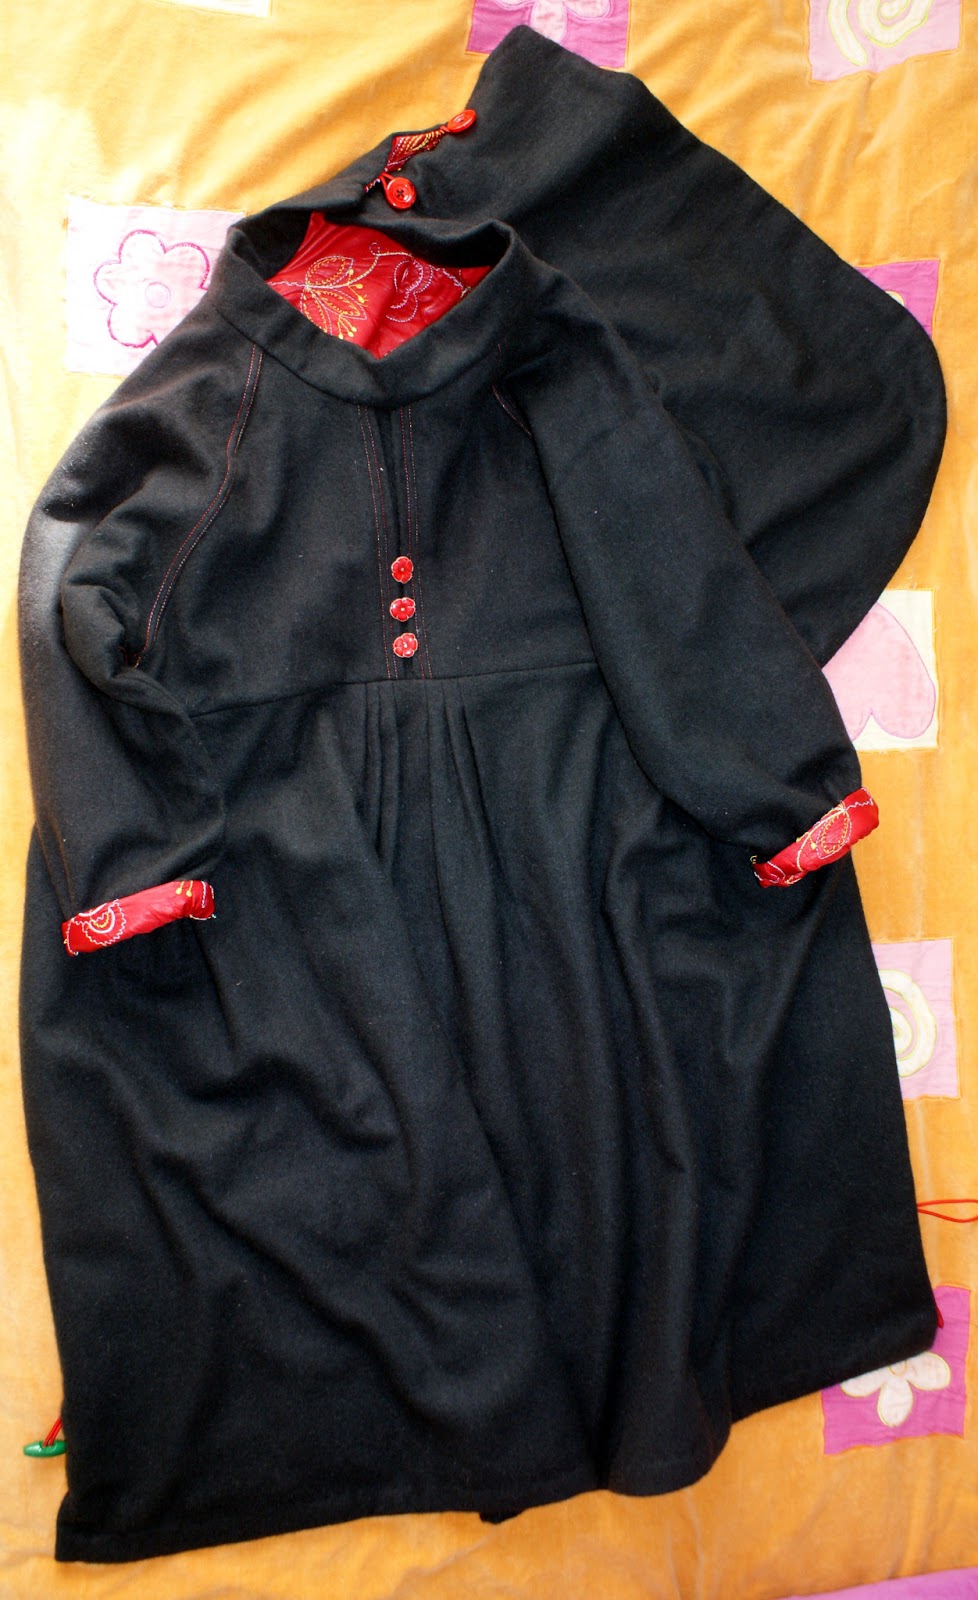
And then ofcourse girly being girly in an all boys family, the idea was born to make this a little dress.

Omdat tante Betje opgroeide in een jongens familie kwam al snel het idee voor een fixatiejurkje.


It looks more complicated than it is. There's two pieces, front and back. The front piece is spiced up with fake seams and a fake button closure. The casing for the belt through the harness is sewn by stopstichting through the front and back. For more comfort there's a piece of lining fabric in the belt tunnel.
The only difficult thing is to do everything in right order.
Cut the back.
Cut the front, allow extra material for fake seams.
Do the details of the front piece.
Sew a strip to line the casing for the belt on the inner side of the back piece. This will make the vest a bit more comfortabel. I used quilted poly lining.

Attach fastening clips to pieces of fastening tape

Then assemble
Stitch through back and front along the top. Have the tape with clips in between the fabric layers.
The sides are left open. Give them a small hem inwards.
Fold bottom hems in and topstitch the bottom seam together.
Stitch a cross on the shoulder part on the tape for the clip. 

Then make the tunnel for the belt. Topstitching. Mark the stitchlines. I found that this is something that doesn't work with eyeballing it. The two layers will slide a bit. Twice topstitching from centerfront to the side will keep it symmetrical.

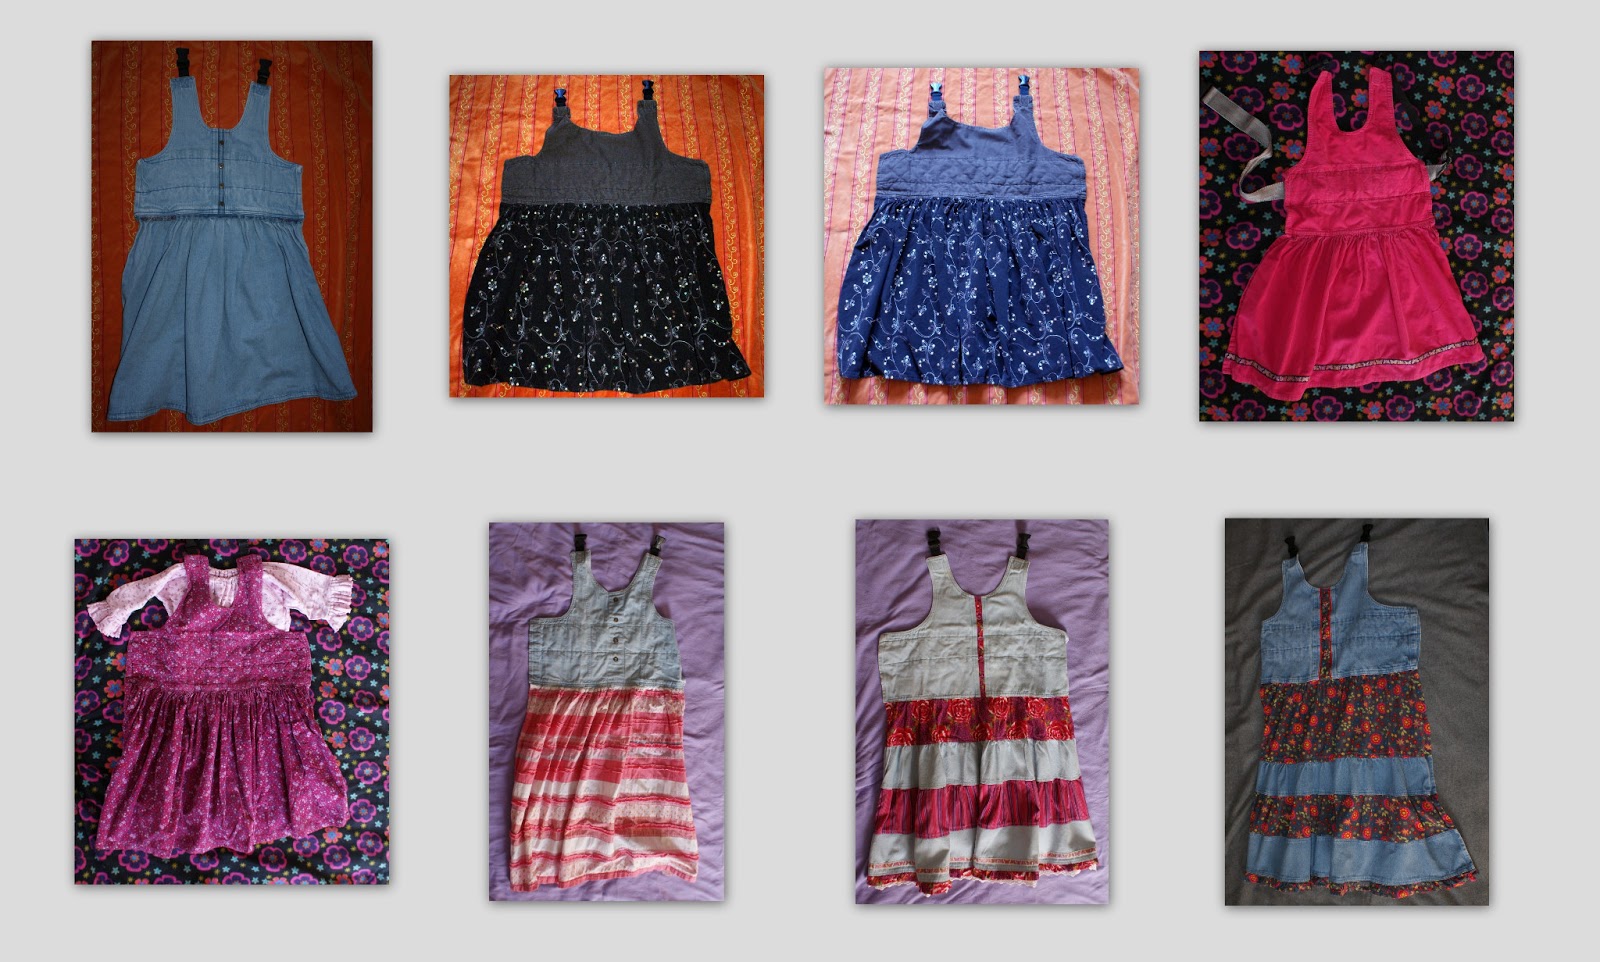
It is very easy to sew a wrinkled skirt in between the two layers of the harness.
Or just a narrow strip of pleated material. The possibilities are endless and great fun to do.
The skirt hides that ugly  abduction wedge. Or make additional wide trousers to resemble an under skirt that peepes out. And dolly can have the same dress!

Ik gebuikte een (auto-) veiligheidsriem met klikgesp. Tunnel wijd genoeg maken zodat de klip er makkelijk doorheen kan.
Het lijkt moeilijker dan het is. De volgorde is belangrijk.
Knip het deel voor de achterkant
Knip het deel voor de voorkant. Houdt rekening met extra stof voor nep naden.
Doe de details zoals knopen, nepzomen label e.d. op het voordeel.
Naai een strip gewatteeerde jas voering aan de binnenkant van het achterdeel op de plek waar de tunnel voor de riem komt.. Dit is om de riem comfortabeler te laten zijn.

Maak schouderklips vast aan een stukje technisch band.
Dan leg alles op elkaar met het band en de schouderklips tussen beide stofdelen. Stik langs de bovenkant. (Arm, schouder, hals.)
Zijkanten open laten en een klein zoompje naar binnen geven.
Onderkant naar binnen vouwen tegen elkaar aan en door beide lagen stikken.
Kruis stikken op het schoudertape.
 De tunnel voor de riem stikken. Goed aftekenen. Ongeduldig als ik en heb ik gemerkt dat dit op het oog doen niet zo goed gaat. De twee lagen hebben de neiging om over elkaar te gaan schuiven. Als je begint vanuit het middenvoor blijft het symmetrisch. Dus twee keer vanuit het midden naar de zijkant stikken naar links en rechts.

Het is makkelijk om tussen de voor- en achterkant van het fixatievest een strip extra stof vast te naaien. met plooien of gerimpeld. Of een vestje dat precies past bij een zelfgemaakte broek.En natuurlijk kan pop dezelfde jurk hebben.

donderdag 24 januari 2013

Trousers. Sitter pants. Rolstoelbroek

 It is one of the most rewarding jobs to do. Not that difficult. A few hours work and  some careful thinking ahead and planning. And there you have it, a beautiful (cheap) well adjusted properly fiiting wheelchair sitter pant.

Trousers for somebody sitting in a wheel chair do need to be a bit higher in the back and lower in the front to be comfortable.. And some extra space to accomodate for incontinence products. To start with I used an ordinary pants pattern with an elastic waistline. I adjusted this a bit by measuring up how much I wanted to add in the back and shorten in the front.
The dotted pattern line is a basic  normal pant pattern. I had to add about 10 cm to the center back seam and shortened about 8 cm at the front for a size 10-12 years, 146-154 cm long child's, pattern.
,

This does change the waist line a bit. I talked about it with somebody who was schooled in design. There are better ways. I will try to show this in a future post. However eyeballing it does work pretty well also.

To make basic pants a bit more exciting you can add some detail, whatever adds some  spice.
A fake zipper or pocket.  A label. The lower part of the pant is a good place to put these. It is were details are visible and not uncomfortabel to sit on. The denim trousers shown underneath were  a nice try but the waist detail only visible when dressing.

Mock seams work well. Make sure you do allow fabric for them and do details before you sew all the trouser pieces together. 


Een broekpatroon veranderen.
Een  van de leukere en makkelijke dingen om te doen. Een broek naai je in een paar uurtjes in elkaar. Met als resultaat een mooie, hippe, goed zittende en goedkope rolstoelbroek.
De broek moet aan de voorkant wat lager en aan de achterkant wat hoger zitten. Een beetje extra ruimte voor incontinentie materiaal. Bij een broek voor een kind van 146-152 cm lang moest ik ongeveer 10 cm extra aan de achterkant en 8 cm verkorten aan de voorkant. Het handigst is een patroon met een elastiek door de taille.
Op de tekening van het patroon kun je zien hoe je dat doet. De stippellijn is de taille lijn op een normaal basisbroekpatroon. Daarmee verander je de taillelijn wel. Er is een betere manier om dit te doen, maar inschatten en improviseren werkt prima!
Met wat details is de broek makkelijk wat te verfraaien. (nep) deelnaden, (nep) zakken, labels e.d. Het onderbeen is hier een goed plek voor. Daar zijn ze zichtbaar en zit je er niet oncomfortabel bovenop. Zo was de denim broek links boven een leuk probeersel maar de details in de taille natuurlijk alleen te zien bij aan- en uitkleden.Denk en plan de details zorgvuldig vooraf en verwerk ze voordat je de broek helemaal in elkaar zet! Als de pijpen gesloten zijn lukt dit nog maar moeilijk.

vrijdag 18 januari 2013

Wet wipes cozy Billendoekjes

Always schlepping wet wipes around. Well, yes you can buy a decorative plastic box . Or sew a hip wet wipes holder. I got 'hooked' om making little african crochet flowers.The hexagons turned out to have a good shape and size to turn them into a wet wipes cozy.

Altijd billendoekjes bij je. Je kunt er een hip mapje of plastic doosje voor vinden. 
Ik was helemaal verslaafd aan het maken van deze bonte bloemetjes. De hexagon vorm is geschikt om er een mooi mapje voor de billendoekjes van te maken.  Het half open hexagon bovenop geeft genoeg ruimte om een pakje doorheen te wurmen . De opening is groot genoeg om goed bij de doekjes te kunnen.


There are lots of patterns for the african crochet flower available on the internet. I used the pattern on Heidi Bears website.
Het patroon voor de bloemen is te vinden als 'african flower crochet'
http://heidibearscreative.blogspot.nl/2010/05/african-flower-hexagon-crochet-tutorial.html

I rediscovered crochet and found it very relaxing and calming. Some crochet therapy and there it was, my cell phone cozy. Technique: tunesian stitch in lots of colors.. Loop row color A, reverse row color B, looprow color B, reverse row color C etc.Thus switching colors between forward row (pulling loops) and reverse row. And then its the flipside of the work!
Haken is zo'n kalmerende en ontspannende bezigheid. Haaktherapie en een mooi tasje voor de telefoon. Dit mapje is gemaakt van tunesisch haakwerk. Lussenrij kleur A, terug met kleur B, lussenrij kleur B, terug met kleur C. Kleurwissel tussen heengaande rij en teruggaande rij.
Het mapje is de achterkant van dit haakwerk!


vrijdag 11 januari 2013

Ritsen. Zippers not hidden in uncomfortabel places

Extra zippers are used  to make it easier to dress a spastic person.
In side seams. I have seen T-shirts with zippers underneath armpits!
 I thought about doing this and found it would be better to put them in places were they are visible as an accent and less of a burden to sensitive skin.

Ritsen kom je vaak tegen in kleding gemaakt voor spastische mensen. Ze maken het aankleden makkelijker Vaak zitten ze dan in een uit het oog onttrokken plek, waar ze toch oncomfortabel zijn. Zo zag ik T-shirts met een rits in de oksel!


Little girly could fit into a A-line jacket but as she grew and became more rigid, I had to find something else. Thinking about zippers I came up with this jacket based on a A-line pattern. I made a lengthwise seam in the sleeves. You might find a pattern that has a seam like this. Otherwise folding the sleeve pattern part lengthwise will tell you how to cut it in half.

This jacket is so easy to put on.

Toen tante Betje nog klein was lukte het om haar in een A-lijn jasje te krijgen. Met het groter en stijver worden lukte dat niet meer en ben ik gaan nadenken over ritsen. Het resultaat, dit jasje dat helemaal om haar heen gevouwen kan worden.


Then I wanted do do this again in a completely different style with the zipper more as an accent.

Het jasje beviel zo goed dat ik het nog een keer wilde maken in een compleet andere stijl met de rits als een goed zichtbaar accent.


zondag 16 december 2012

Another Hat


Same pattern as the april 2011post. Zelfde patroon als april 2011 post.

To give this hat a tight fit around the head  I left out knitting 5 stitches every 5 or 6 rows or so. Turning the work 5 stitches before the end. A little cable before this 5 stitch edge will hide the little holes caused by turming before the row is finished. and give a nice seperation. The flower beads are sewed on.
The side picot stitches are knitted on with this technique,

http://planetpurl.com/community/index.php?page=videos&section=view&vid_id=100014

Deze muts is om het gezicht wat strakker gemaakt door een vijftal steken niet te breien om de vijf of zes toeren of zo. Je keert het werk en breit terug en laat de laatste 5 steken liggen. Hierdoor is de strip langs het gezicht net wat korter waardoor de muts mooi strak om het gezicht blijft zitten. Tussen de  5 randsteken aan de kant van het gezicht en het hoofddeel een smal kabbeltje om een mooie overgang te maken. De picot's aan de rand zijn meteen mee gebreid. Op het filmpje in de link hierboven zie je hoe dit kunt doen.

Another hat. Knitted with the help of a knittingmachine :)